8 Tips to Export the Best Quality Pictures From Apple Photos

Ticket to ride
The whole idea of Apple Photos is to create a safe, secure library of pictures that can be called up and exported on demand, customized for their particular destination.
The MacOS has made it so easy to drag and drop pictures from Apple Photos to the desktop, or to copy and paste into an email, that we often overlook the option of making simple adjustments that can tune the pictures in size and quality for the specific task at hand.
The other day I helped a lovely client of mine get her photo sized and exported so it could be included in a magazine of art for her community. The first couple of submissions had been unintentionally reduced in size during the submission process.
The flip side, of course, is when a photo is rejected by an online service for being too big.
Back in the day, when we submitted photo prints for projects, it was the printer or graphic artists who scanned and adjusted the pictures for publishing - paper or digital. Now it is we who are responsible for getting the photos delivered in the best way for the purpose at hand.
Exporting a photo properly is not that tough.
Start by picking the image(s) you want to send out. Make any color adjustments and crops you want right in Apple Photos so they export as you want them to appear in print or online.
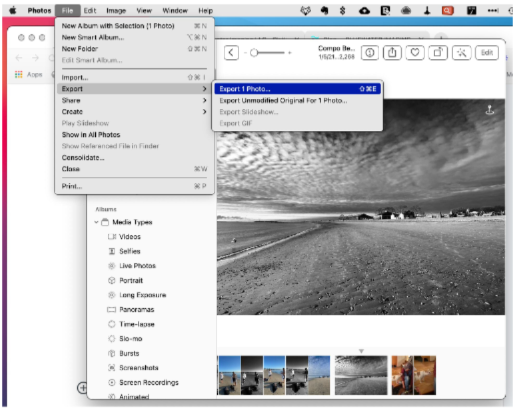
Next, use the Photos menu to choose File > Export > Export 1(or whatever) Photo.
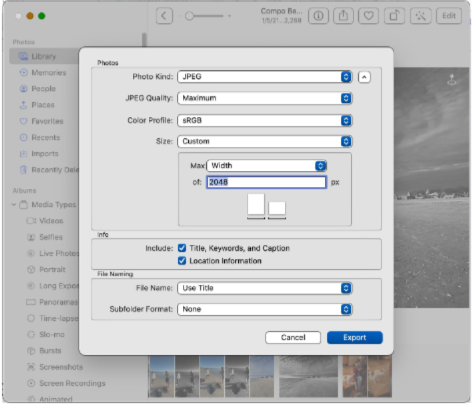
Here's where the magic happens. You get a dialogue the lets you manage all the settings that your printer/web developer gave you that sounded like Greek. Typically:
JPEG is a universally accepted image format. Use this unless your designer asks for something else.
JPEG Quality should be High for print and Medium or High for web.
Color Profile will likely be sRGB unless you are sending to a commercial printer for highest quality print and then Adobe RGB may be specified.
Size should be Full Size if sending out for Print or can be set to a specific pixel width or height for web. Mis-sizing is a common problem. It's common to see a shared collection for photo books where many images are too small to print at a decent size and you get the little warning triangles.
Info can include a title, keywords and caption if you'd add any in Photos
Location information will stick if you choose so that Social Media can identify that in your post.
The File Naming dialogue lets you use the actual image name or a Title, AND you can have a group of photos export with a common name with a sequence of numbers. Very handy if you've manually put your photos in order and want them numbered that way for reference.
The Subfolder option is in case you want to use the Moment to name the export folder.
When you click on Export you'll get the standard MacOS Finder dialogue to create a target folder for the images. I like to create folders on iCloud Drive as destinations since they are accessible from all my devices - including iPhone - and I can access them from social media apps for upload or set them up as shared folders, same as Dropbox.
The beauty of this system is that no Originals were harmed. It exports disposable versions of the photos, the way that Apple intended. After the images are shared, the folders can be emptied, ready for the next export.
One caution. If you are attaching these photos to an email, be sure that you are sending them at Actual Size. Otherwise all the size and quality settings you chose will be changed and the photos will likely arrive at a smaller and possibly unusable size.